The Picky Pigeons
Contents
The Picky Pigeons
This section of the course handbook has been provided as part of the final group project for the Seminar on Tracking Animal Behavior at the Ruhr-University Bochum in WS21/22.
Abstract
Analyzing animal behavior has always brought up certain challenges, most of which can be overcome using the open source, markerless source estimation toolbox DeepLabCut. When performing a DeepLabCut analysis the most important decision is the number of tracking points used for training the model.
To investigate how this influences the softwares confidence, we trained two models using the same dataframes but different numbers of tracking points. We used top-view videos of eight pigeons in a cage and extracted 20 frames per video for labeling. For the less complicated model we used seven tracking points; for the more complicated model we added an extra of 15 points, resulting in overall 22 tracking points. We hypothesise the following:
There is a lower pixel difference in the complex model.
The confidence of the model is higher in the complex model.
Additionally, we investigated how the different complexity levels influence the work flow of labeling the frames. Thus, each group member filled out the Flow-Kurz Skale (Rheinberg, 2000) while labeling each model. We hypothesise that:
The experienced flow is higher in the easy model (measured with the Flow-Kurzskala (FKS).
Overall, we try to figure out, what number of tracking points yields the best balance between workload and accuracy.

Fig. 19 Sample of test and training frames from deeplabcut.evaluate_network()
Data Analysis
1. pixel difference/confidence of model:
First, we describe descriptively the mean pixel errors in both models.
The simple model resulted for 1030000 training iterations with a p-cutoff of 0.6 in a test error of 6.7 pixels whereas the complex model resulted in a test error of 6.5 pixels. That means, the complex model was in average 0.2 pixels better in predicting the points.
Although it may be not statistically significant there seems to be a tendency of higher confidence and lower mean pixel error in the complex model than in the easy model. This is contrary to our proposed hypothesis.
2. flow:
Here, we describe our results of our questionnaire to experienced flow.
In the easy model the average flow experience was 50 (range: 7-70), while in the complex model it was 53.25. Besides the flow experience we assessed the concern about the exercise via the flow-scale, resulting in an average of 10 (range: 3-30) in the easy model and an average of 11 in the complex model.
That said, contrary to our hypothesis, the flow seemed to be higher in labeling the complex model instead of the easy model.
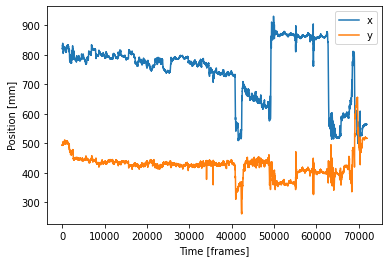
3. explorative: Position in space
We chose the backcenter point as the point to track the position of the pigeon in space. This point is enclosed in both models which enables a comparison of the models. For comparison, we plot the positions in a scatter plot.
First, import packages and define file, how to read file, and relevant information of file.
# import relevant packages
import pandas as pd
import numpy as np
import matplotlib.pyplot as plt
# define file that is used, how and what to read of the csv file, and define which columns are used in coords
file = 'C:/Users/USER/Documents/Picky_Pigeon_Project-The_Picky_Pigeons-2021-12-17/videos/166_filtered - Kopie.csv'
data = pd.read_csv(file, header=0) #headings of the columns are = row 0
coords = data.loc[:,data.columns.str.contains('backcenter')] #all rows and all columns that contain backcenter define coords
# output coords
coords
| backcenter | backcenter.1 | backcenter.2 | |
|---|---|---|---|
| 0 | 819.974548 | 494.949646 | 0.999818 |
| 1 | 819.925218 | 494.904734 | 0.999708 |
| 2 | 821.008876 | 495.086856 | 0.999528 |
| 3 | 822.399030 | 495.153400 | 0.999729 |
| 4 | 823.219302 | 494.142786 | 0.999571 |
| ... | ... | ... | ... |
| 71920 | 564.234147 | 517.139613 | 0.999623 |
| 71921 | 564.201800 | 517.161179 | 0.999610 |
| 71922 | 564.292883 | 517.262576 | 0.999495 |
| 71923 | 564.375360 | 517.289639 | 0.999680 |
| 71924 | 564.437141 | 517.552503 | 0.999595 |
71925 rows × 3 columns
Here, define your first plot of position over time.
# define your plot with the defined coords backcenter as x values and backcenter.1 as y values and label the plot
position_x = coords['backcenter']
position_y = coords['backcenter.1']

pos_x, = plt.plot(position_x, label='x')
pos_y, = plt.plot(position_y, label='y')

plt.xlabel('Time [frames]')
plt.ylabel('Position [mm]')
plt.legend()
<matplotlib.legend.Legend at 0x197ae19b760>
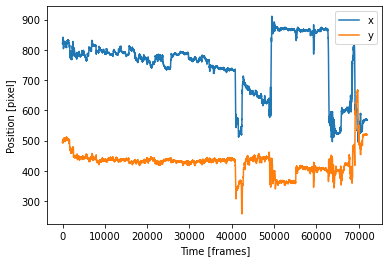
This is how it looks like in the complex model:
from IPython.display import Image
Image("F:/Picky_Pigeon_Project-The_Picky_Pigeons_part2-2021-12-17/PlotComplex.png")
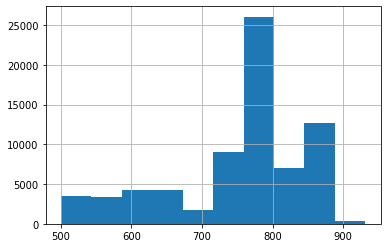
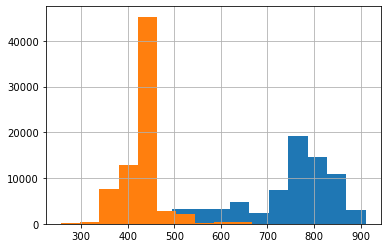
You can also define histogram plots for the x and y values each:
# histogram plot with x values
position_x.hist()
<AxesSubplot:>
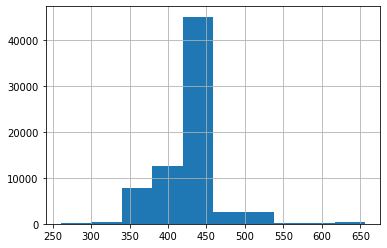
# histogram plot with y values
position_y.hist()
<AxesSubplot:>
This is how it looks like in the complex model:
from IPython.display import Image
Image("F:/Picky_Pigeon_Project-The_Picky_Pigeons_part2-2021-12-17/histComplex.png")
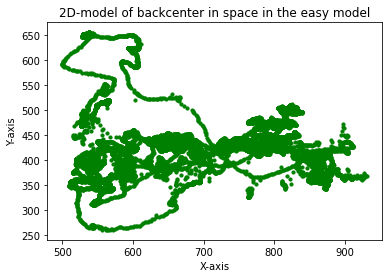
And finally also a scatter plot:
# create a 2d plot
x = coords['backcenter']
y = coords['backcenter.1']

fig = plt.scatter(x,y,marker='o', s = 10, c='green');

# adding title and labels
plt.title("2D-model of backcenter in space in the easy model")
plt.xlabel("X-axis")
plt.ylabel("Y-axis")

# displaying plot
plt.show()
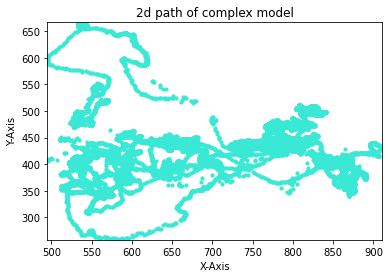
This is how it looks like in the complex model:
from IPython.display import Image
Image("F:/Picky_Pigeon_Project-The_Picky_Pigeons_part2-2021-12-17/complexScatter.png")
Conclusion
Based on our data analysis the complex and simple model seemed not to differ significantly in accuracy of tracking. It may be that a model with more tracking points is better regarding prediction error and flow experience in a bigger study with more data. However, there may be non-linearic correlations between number of tracking points and accuracy of the model and between number of tracking points and flow-experience. There is no evidence yet and this research question is left for future research.
Notes
For starting Deeplabcut use one of the following code cells
# 1. activate conda environment
conda activate dlc
# 2. start IPython
ipython
# 3. start DLC GUI
deeplabcut.launch_dlc()
or
# 1. activate conda environment
conda activate dlc
# 2. run deeplabcut
python -m deeplabcut
For opening a notebook use the following commands:
conda activate dlc
cd documents
jupyter notebook
Remember that the notebook has to be trusted and that the Kernel has to be conda env:dlc
For closing/ending a process type strg+c in the prompt
Trouble Shooting
here are some errors and solutions that might occur while creating your project:
IndexError: list index out of range
–> there mustn´t be more than two bodyparts in a skeleton connection
–> solution: combine only two bodyparts and watch out for indexingsystem cannot find path specified
–> check correctness of path
–> check direction of slashes
–> if you changed the path, run code sections againyou should not use spaces in path names
–> solution: use underscores or write names together! :)do NOT close the prompt or type ctrl+c during processing!!!
–> during processing, there is a star between parentheses and a sand clock on top of the notebook
–> when finished, there is a number bw parenthesesdo not use the mouse in the anaconda prompt! –> navigate using keyboard
do not use Alt+F4
discuss where to locate the tracking points
name the body parts so that you intuitively understand what they label
This is our own project - named Picky Pigeons
We want to investigate if it makes a big difference using a few vs. using a lot of labels. These are our methods:
there are 20 frames per video and 8 videos
the ‘easy’ project uses 7 labels, the ‘hard’ project uses 22 labels during frame labeling (see below under ‘configure project’ for the specification of labels)
everyone labels 2x20 frames with the easy version, and 2x20 frames with the complex version on the same videos (my videos: nrs. 159, 161)
after finishing the first video in each condition (so after 20 frames), the questionnaire is filled
after labeling frames we counter check the labels of each other
the program trains with 1 million iterations (maximum possible)!!
our hypotheses:
There is a lower pixel difference in the more label version.
The confidence of the model is higher in the more label version.
The lower label version is faster to label.
The experienced flow is higher in the low label version (measured with the Flow-Kurzskala (FKS).
DeepLabCut Notebook
Starting an existing project
This is for opening the project via your gui
Sometimes it is easier to start an existing project with your gui because here it is easier to handle the project and pick the config file where you created the project.
For opening your project via the gui use the following code chunk in a new anaconda prompt:
conda activate dlc
python -m deeplabcut
When your gui is activated, click “load existing project” and then under “select config file” choose your respective config.yaml file.
These are the normal commands:
step 1: import python libraries
try:
    import deeplabcut
    import tensorflow
    import tkinter
    from tkinter import filedialog

    print(f'Using DeepLabCut version: {deeplabcut. __version__}')
    print(f'Using TensorFlow version: {tensorflow. __version__}')

except:
    print("Please run the notebook in in your local environment")
Using DeepLabCut version: 2.2.0.2
Using TensorFlow version: 2.7.0
step 2: open existing project using config_path command
config_path = filedialog.askopenfilename(title='Choose DeepLabCut config.yaml file:')
For labeling frames use the following code chunks:
label frames
check frames
step 3: Label frames
deeplabcut.label_frames(config_path)
step 4: Check frames
You can plot your labeled frames to check your annotation accuracy.
deeplabcut.check_labels(config_path)
Note: If there is a mistake in the labeling, label frames new by rerunning step 3. Then delete the folder with ‘labeled’ at the end and rerun the command ‘check frames’ of step 4.
note: if you already created a training set you can skip the code chunks after ‘create project’
For creating the training data set and training the model use the code chunks of steps 5 and 6:
create training data set
train model
Note: For comparative DLC projects, i.e., comparing different models based on similar data, the training and test datasets need to be comparable. This needs a little manual coding to re-edit a few files (see below).
Note: you don’t need this part if you created a project already
For creating a new DeepLabCut Project use the following code blocks
Import python libraries needed for this notebook
try:
    import deeplabcut
    import tensorflow
    import tkinter
    from tkinter import filedialog

    print(f'Using DeepLabCut version: {deeplabcut. __version__}')
    print(f'Using TensorFlow version: {tensorflow. __version__}')

except:
    print("Please run the notebook in in your local environment")
Using DeepLabCut version: 2.2.0.2
Using TensorFlow version: 2.7.0
Start by selecting the list of videos to be included in the model.
(You could manually type the full path of each video in a python list as argument of the deeplabcut.create_new_project() function, like so:)
However, instead use the code chunk below with tkinter where you can just select the videos and not have to type each one out!
['C:\\Users\\computername\\Videos\\reachingvideo1.avi',
 'C:\\Users\\computername\\Videos\\reachingvideo2.avi',
 'C:\\Users\\computername\\Videos\\reachingvideo3.avi']
Note
Windows users need to use the double backslash for path directories or a python raw filestring.
use this code chunk below here: Instead, we use tkinter to open a file dialoge and save the file paths in a python list called videolist:
video_files = filedialog.askopenfilenames(title='Choose new video files to analyze in DeepLabCut:')
videolist = list(video_files)

print(f'{len(videolist)} videos selected:')
for i in range(len(videolist)):
    print(videolist[i])
8 videos selected:
C:/Users/USER/Documents/Picky_Pigeon_Project-The_Picky_Pigeons-2021-12-17/videos/159.MP4
C:/Users/USER/Documents/Picky_Pigeon_Project-The_Picky_Pigeons-2021-12-17/videos/161.MP4
C:/Users/USER/Documents/Picky_Pigeon_Project-The_Picky_Pigeons-2021-12-17/videos/162_1100ms_gopro_cut_day4_gp2-007.MP4
C:/Users/USER/Documents/Picky_Pigeon_Project-The_Picky_Pigeons-2021-12-17/videos/163_100ms_gopro_cut_day4_gp1-003.MP4
C:/Users/USER/Documents/Picky_Pigeon_Project-The_Picky_Pigeons-2021-12-17/videos/164_100ms_gopro_cut_day4_gp1-005.MP4
C:/Users/USER/Documents/Picky_Pigeon_Project-The_Picky_Pigeons-2021-12-17/videos/165_600ms_gopro_cut_day7_gp4-004.MP4
C:/Users/USER/Documents/Picky_Pigeon_Project-The_Picky_Pigeons-2021-12-17/videos/166_600ms_gopro_cut_day7_gp4-001.MP4
C:/Users/USER/Documents/Picky_Pigeon_Project-The_Picky_Pigeons-2021-12-17/videos/167_1100ms_gopro_cut_day4_gp2-002.MP4
Now we create a new project using the video paths in videolist, give the project a name and set a few parameters:
config_path = deeplabcut.create_new_project('Picky_Pigeon_Project', 'The_Picky_Pigeons', videolist, working_directory='C:/Users/USER/Desktop/Picky_Pigeon_Project', copy_videos=True, multianimal=False)
Created "C:\Users\USER\Desktop\Picky_Pigeon_Project\Picky_Pigeon_Project-The_Picky_Pigeons-2021-12-17\videos"
Created "C:\Users\USER\Desktop\Picky_Pigeon_Project\Picky_Pigeon_Project-The_Picky_Pigeons-2021-12-17\labeled-data"
Created "C:\Users\USER\Desktop\Picky_Pigeon_Project\Picky_Pigeon_Project-The_Picky_Pigeons-2021-12-17\training-datasets"
Created "C:\Users\USER\Desktop\Picky_Pigeon_Project\Picky_Pigeon_Project-The_Picky_Pigeons-2021-12-17\dlc-models"
Copying the videos
C:\Users\USER\Desktop\Picky_Pigeon_Project\Picky_Pigeon_Project-The_Picky_Pigeons-2021-12-17\videos\159.MP4
C:\Users\USER\Desktop\Picky_Pigeon_Project\Picky_Pigeon_Project-The_Picky_Pigeons-2021-12-17\videos\161.MP4
C:\Users\USER\Desktop\Picky_Pigeon_Project\Picky_Pigeon_Project-The_Picky_Pigeons-2021-12-17\videos\162_1100ms_gopro_cut_day4_gp2-007.MP4
C:\Users\USER\Desktop\Picky_Pigeon_Project\Picky_Pigeon_Project-The_Picky_Pigeons-2021-12-17\videos\163_100ms_gopro_cut_day4_gp1-003.MP4
C:\Users\USER\Desktop\Picky_Pigeon_Project\Picky_Pigeon_Project-The_Picky_Pigeons-2021-12-17\videos\164_100ms_gopro_cut_day4_gp1-005.MP4
C:\Users\USER\Desktop\Picky_Pigeon_Project\Picky_Pigeon_Project-The_Picky_Pigeons-2021-12-17\videos\165_600ms_gopro_cut_day7_gp4-004.MP4
C:\Users\USER\Desktop\Picky_Pigeon_Project\Picky_Pigeon_Project-The_Picky_Pigeons-2021-12-17\videos\166_600ms_gopro_cut_day7_gp4-001.MP4
C:\Users\USER\Desktop\Picky_Pigeon_Project\Picky_Pigeon_Project-The_Picky_Pigeons-2021-12-17\videos\167_1100ms_gopro_cut_day4_gp2-002.MP4
Generated "C:\Users\USER\Desktop\Picky_Pigeon_Project\Picky_Pigeon_Project-The_Picky_Pigeons-2021-12-17\config.yaml"

A new project with name Picky_Pigeon_Project-The_Picky_Pigeons-2021-12-17 is created at C:\Users\USER\Desktop\Picky_Pigeon_Project and a configurable file (config.yaml) is stored there. Change the parameters in this file to adapt to your project's needs.
 Once you have changed the configuration file, use the function 'extract_frames' to select frames for labeling.
. [OPTIONAL] Use the function 'add_new_videos' to add new videos to your project (at any stage).
Note
You can load existing DeepLabCut projects by specifying the config_path as below:
config_path = filedialog.askopenfilename(title='Choose DeepLabCut config.yaml file:')
Configure Project
Now that a new project has been created with a specific directory structure and configuration file, we need to tweak some parameters to tailor the bodyparts we want to track:
import webbrowser
webbrowser.open(config_path)
print('Please edit bodyparts list to be tracked')
Please edit bodyparts list to be tracked
Once happy with all bodyparts, skeleton: and numframes2pick: settings, start extracting frames to label:
These are the body parts and skeleton connections we used for the easy model:
bodyparts:
beaktip
tophead
neckbase
tailend
wingbowleft
wingbowright
backcenter
start: 0 stop: 1 numframes2pick: 20
Plotting configuration skeleton:
beaktip
tophead
tophead
neckbase
neckbase
backcenter
backcenter
tailend
neckbase
wingbowleft
neckbase
wingbowright
These are the bodyparts and skeleton configs we used for the complex model:
bodyparts:
beaktip
beakbase
beakcornerleft
beakcornerright
tophead
headback
lefteye
righteye
neckbase
leftshoulder
rightshoulder
wingbowleft
wingbowright
wingendleft
wingendright
chest
necktocenter
backcenter
centertotailend
tailend
tailendleft
tailendright
start: 0 stop: 1 numframes2pick: 20
Plotting configuration skeleton:
beaktip
beakbase
beaktip
beakcornerleft
beaktip
beakcornerright
beakbase
beakcornerleft
beakbase
beakcornerright
beakbase
tophead
tophead
headback
headback
neckbase
neckbase
necktocenter
necktocenter
backcenter
backcenter
centertotailend
centertotailend
tailend
centertotailend
tailendleft
centertotailend
tailendright
tailend
tailendleft
tailend
tailendright
neckbase
leftshoulder
neckbase
rightsoulder
leftshoulder
wingbowleft
rightshoulder
wingbowright
wingbowleft
wingendleft
wingbowright
wingendright
chest
leftshoulder
chest
rightshoulder
Extract frames from the videos
To label frames, first you need to extract frames from the videos. Do that using the following command:
deeplabcut.extract_frames(config_path, mode='automatic', algo='kmeans', userfeedback=False, crop=False)
Config file read successfully.
Extracting frames based on kmeans ...
Kmeans-quantization based extracting of frames from 0.0  seconds to 599.97  seconds.
Extracting and downsampling... 71924  frames from the video.
71924it [10:18, 116.20it/s]
Kmeans clustering ... (this might take a while)
Extracting frames based on kmeans ...
Kmeans-quantization based extracting of frames from 0.0  seconds to 599.98  seconds.
Extracting and downsampling... 71926  frames from the video.
71926it [10:13, 117.31it/s]
Kmeans clustering ... (this might take a while)
Extracting frames based on kmeans ...
Kmeans-quantization based extracting of frames from 0.0  seconds to 599.99  seconds.
Extracting and downsampling... 71927  frames from the video.
71927it [10:17, 116.55it/s]
Kmeans clustering ... (this might take a while)
Extracting frames based on kmeans ...
Kmeans-quantization based extracting of frames from 0.0  seconds to 599.98  seconds.
Extracting and downsampling... 71926  frames from the video.
71926it [10:10, 117.74it/s]
Kmeans clustering ... (this might take a while)
Extracting frames based on kmeans ...
Kmeans-quantization based extracting of frames from 0.0  seconds to 599.98  seconds.
Extracting and downsampling... 71926  frames from the video.
71926it [10:02, 119.38it/s]
Kmeans clustering ... (this might take a while)
Extracting frames based on kmeans ...
Kmeans-quantization based extracting of frames from 0.0  seconds to 599.99  seconds.
Extracting and downsampling... 71927  frames from the video.
71927it [10:04, 118.97it/s]
Kmeans clustering ... (this might take a while)
Extracting frames based on kmeans ...
Kmeans-quantization based extracting of frames from 0.0  seconds to 599.97  seconds.
Extracting and downsampling... 71925  frames from the video.
71925it [09:44, 123.08it/s]
Kmeans clustering ... (this might take a while)
Extracting frames based on kmeans ...
Kmeans-quantization based extracting of frames from 0.0  seconds to 599.99  seconds.
Extracting and downsampling... 71927  frames from the video.
71927it [09:45, 122.94it/s]
Kmeans clustering ... (this might take a while)
Frames were successfully extracted, for the videos of interest.

You can now label the frames using the function 'label_frames' (if you extracted enough frames for all videos).
Label Frames
deeplabcut.label_frames(config_path)
You can plot your labeled frames to check your annotation accuracy.
deeplabcut.check_labels(config_path)
Step 5: create training data set:
Note: This step is edited manually. To compare two models trained on the same frames with different number of keypoints, a single test/train split has to be shared across projects.
Alternative 1
Create a training dataset on one of the projects (in this case the one with the complete set of keypoints)
Duplicate the project with identical frames extracted
Edit the
config.yamlto adjust project parameters such as keypoints and skeletonRe-label identical frames
Pass the same trainIndices and testIndices to
deeplabcut.create_training_dataset()See docstring here: https://github.com/DeepLabCut/DeepLabCut/blob/2d813d96277b84dae4256b1465e76e79fd9b0bb3/deeplabcut/generate_training_dataset/trainingsetmanipulation.py#L722 Pro: Easy if steps followed carefully
Con: Both projects have slightly different labeles, as frames were manually labeled twice. You could have first labeled the smaller project, then duplicate the project, add new keypoints toconfig.yaml, and re-label all frames only for new additional keypoints.
Alternative 2
If both project differ in the number of keypoints, but the lower number of keypoints is a subset of the first, don’t label the same frames manually again! See con above, these keypoints will be slightly different.
You could now still duplicate the project with larger amount of keypoints
Edit
config.yamlfile to reduce subset of keypointsMaunally remove unwanted keypoints from
.h5files inlabeled-dataPass the same trainIndices and testIndices to
deeplabcut.create_training_dataset()as above Pro: Two projects use exact same coordinates for common keypoints
Con: Messy to manually edit.h5files
Alternative 1
# Define the train and test indices as used in the first project
trainIndices = np.array([133,  16,   8,  22,  28,  43, 156,  70,  17,  23,  94,   3,  26,
          116, 154,  19,  49, 137, 115,   6, 100,  92,  89, 135, 122,  45,
          129,   0,  61,  33,  27, 110,  39, 144, 113, 128,  38,  14, 140,
          123,  36,  75,  20,  88, 118,  51,  34,  47, 138,  32,  91,  86,
          131,  35, 149,  87,  13, 103,  64,  58, 117, 141, 101,   5,   9,
          139, 153, 155, 145, 114, 147,  67,  54,  96,  68, 111,  84, 157,
          158, 105, 127,  42,  10,  69,  57,  98, 142,  93, 121, 151,   7,
           71, 112, 109, 119,  82,  15, 107,  60, 159,  30,  85, 102, 125,
          134,  97,  37, 136,  11, 120,  80,  63,  29, 104,  40,  31,  50,
           48,   1,  78,  59,  52,  46,  24, 146,  74, 126,  90,  99, 130,
           66,  12, 108,   2,  77,  62, 152,  72,  81,  41,   4,  53, 106,
           18,  76,  65,  95, 143, 150,  56,  55,  25])
testIndices = np.array([132,  21,  79,  83,  73, 124, 148,  44])
# Pass the given trainIndices and testIndices to create a new dataset
deeplabcut.create_training_dataset(config_path, num_shuffles=1, trainIndices=[trainIndices],testIndices=[testIndices], net_type='resnet_50', augmenter_type='imgaug')
You passed a split with the following fraction: 95%
The training dataset is successfully created. Use the function 'train_network' to start training. Happy training!
[(0.95,
  1,
  (array([133,  16,   8,  22,  28,  43, 156,  70,  17,  23,  94,   3,  26,
          116, 154,  19,  49, 137, 115,   6, 100,  92,  89, 135, 122,  45,
          129,   0,  61,  33,  27, 110,  39, 144, 113, 128,  38,  14, 140,
          123,  36,  75,  20,  88, 118,  51,  34,  47, 138,  32,  91,  86,
          131,  35, 149,  87,  13, 103,  64,  58, 117, 141, 101,   5,   9,
          139, 153, 155, 145, 114, 147,  67,  54,  96,  68, 111,  84, 157,
          158, 105, 127,  42,  10,  69,  57,  98, 142,  93, 121, 151,   7,
           71, 112, 109, 119,  82,  15, 107,  60, 159,  30,  85, 102, 125,
          134,  97,  37, 136,  11, 120,  80,  63,  29, 104,  40,  31,  50,
           48,   1,  78,  59,  52,  46,  24, 146,  74, 126,  90,  99, 130,
           66,  12, 108,   2,  77,  62, 152,  72,  81,  41,   4,  53, 106,
           18,  76,  65,  95, 143, 150,  56,  55,  25]),
   array([132,  21,  79,  83,  73, 124, 148,  44])))]
Step 6: Train Model
deeplabcut.train_network(config_path, shuffle=1, max_snapshots_to_keep=5, displayiters=200, saveiters=20000, maxiters=1030000, allow_growth=True)
Evaluate Model
deeplabcut.evaluate_network(config_path,Shuffles=[1], plotting=True)
Note: Project Path may be too long for Windows if plotting=True, try cloning the project to a shallower directory structure, run evaluate_network and then move the labeled evaluation frames back to original model.
deeplabcut.evaluate_network(config_path,Shuffles=[1], plotting=True)
Running  DLC_resnet50_Picky_Pigeon_ProjectDec17shuffle1_1030000  with # of training iterations: 1030000
This net has already been evaluated!
Plotting...(attention scale might be inconsistent in comparison to when data was analyzed; i.e. if you used rescale)
100%|████████████████████████████████████████████████████████████████████████████████████████████| 160/160 [02:01<00:00, 1.31it/s]
Analyze Videos
video_files = filedialog.askopenfilenames(title='Choose new video files to analyze in DeepLabCut:')
videolist = list(video_files)

print(f'{len(videolist)} videos selected:')
for i in range(len(videolist)):
    print(videolist[i])
8 videos selected:
E:/SeminarTrackingAnimalBehavior/Picky_Pigeon_Project-The_Picky_Pigeons-2021-12-17/videos/159.MP4
E:/SeminarTrackingAnimalBehavior/Picky_Pigeon_Project-The_Picky_Pigeons-2021-12-17/videos/161.MP4
E:/SeminarTrackingAnimalBehavior/Picky_Pigeon_Project-The_Picky_Pigeons-2021-12-17/videos/162_1100ms_gopro_cut_day4_gp2-007.MP4
E:/SeminarTrackingAnimalBehavior/Picky_Pigeon_Project-The_Picky_Pigeons-2021-12-17/videos/163_100ms_gopro_cut_day4_gp1-003.MP4
E:/SeminarTrackingAnimalBehavior/Picky_Pigeon_Project-The_Picky_Pigeons-2021-12-17/videos/164_100ms_gopro_cut_day4_gp1-005.MP4
E:/SeminarTrackingAnimalBehavior/Picky_Pigeon_Project-The_Picky_Pigeons-2021-12-17/videos/165_600ms_gopro_cut_day7_gp4-004.MP4
E:/SeminarTrackingAnimalBehavior/Picky_Pigeon_Project-The_Picky_Pigeons-2021-12-17/videos/166_600ms_gopro_cut_day7_gp4-001.MP4
E:/SeminarTrackingAnimalBehavior/Picky_Pigeon_Project-The_Picky_Pigeons-2021-12-17/videos/167_1100ms_gopro_cut_day4_gp2-002.MP4
deeplabcut.analyze_videos(config_path, videolist, shuffle=1, save_as_csv=True, videotype='mp4' )
Using snapshot-1030000 for model E:/SeminarTrackingAnimalBehavior/Picky_Pigeon_Project-The_Picky_Pigeons-2021-12-17\dlc-models\iteration-0\Picky_Pigeon_ProjectDec17-trainset95shuffle1
C:\Users\hidalggc\Anaconda3\envs\dlc\lib\site-packages\tensorflow\python\keras\engine\base_layer_v1.py:1692: UserWarning: `layer.apply` is deprecated and will be removed in a future version. Please use `layer.__call__` method instead.
  warnings.warn('`layer.apply` is deprecated and '
Starting to analyze %  E:/SeminarTrackingAnimalBehavior/Picky_Pigeon_Project-The_Picky_Pigeons-2021-12-17/videos/159.MP4
Loading  E:/SeminarTrackingAnimalBehavior/Picky_Pigeon_Project-The_Picky_Pigeons-2021-12-17/videos/159.MP4
Duration of video [s]:  599.97 , recorded with  119.88 fps!
Overall # of frames:  71924  found with (before cropping) frame dimensions:  1280 960
Starting to extract posture
72619it [35:07, 34.46it/s]
Saving results in E:\SeminarTrackingAnimalBehavior\Picky_Pigeon_Project-The_Picky_Pigeons-2021-12-17\videos...
Saving csv poses!
Starting to analyze %  E:/SeminarTrackingAnimalBehavior/Picky_Pigeon_Project-The_Picky_Pigeons-2021-12-17/videos/161.MP4
Loading  E:/SeminarTrackingAnimalBehavior/Picky_Pigeon_Project-The_Picky_Pigeons-2021-12-17/videos/161.MP4
Duration of video [s]:  599.98 , recorded with  119.88 fps!
Overall # of frames:  71926  found with (before cropping) frame dimensions:  1280 960
Starting to extract posture
72619it [35:01, 34.56it/s]
Saving results in E:\SeminarTrackingAnimalBehavior\Picky_Pigeon_Project-The_Picky_Pigeons-2021-12-17\videos...
Saving csv poses!
Starting to analyze %  E:/SeminarTrackingAnimalBehavior/Picky_Pigeon_Project-The_Picky_Pigeons-2021-12-17/videos/162_1100ms_gopro_cut_day4_gp2-007.MP4
Loading  E:/SeminarTrackingAnimalBehavior/Picky_Pigeon_Project-The_Picky_Pigeons-2021-12-17/videos/162_1100ms_gopro_cut_day4_gp2-007.MP4
Duration of video [s]:  599.99 , recorded with  119.88 fps!
Overall # of frames:  71927  found with (before cropping) frame dimensions:  1280 960
Starting to extract posture
72619it [36:01, 33.60it/s]
Saving results in E:\SeminarTrackingAnimalBehavior\Picky_Pigeon_Project-The_Picky_Pigeons-2021-12-17\videos...
Saving csv poses!
Starting to analyze %  E:/SeminarTrackingAnimalBehavior/Picky_Pigeon_Project-The_Picky_Pigeons-2021-12-17/videos/163_100ms_gopro_cut_day4_gp1-003.MP4
Loading  E:/SeminarTrackingAnimalBehavior/Picky_Pigeon_Project-The_Picky_Pigeons-2021-12-17/videos/163_100ms_gopro_cut_day4_gp1-003.MP4
Duration of video [s]:  599.98 , recorded with  119.88 fps!
Overall # of frames:  71926  found with (before cropping) frame dimensions:  1280 960
Starting to extract posture
72619it [41:52, 28.90it/s]
Saving results in E:\SeminarTrackingAnimalBehavior\Picky_Pigeon_Project-The_Picky_Pigeons-2021-12-17\videos...
Saving csv poses!
Starting to analyze %  E:/SeminarTrackingAnimalBehavior/Picky_Pigeon_Project-The_Picky_Pigeons-2021-12-17/videos/164_100ms_gopro_cut_day4_gp1-005.MP4
Loading  E:/SeminarTrackingAnimalBehavior/Picky_Pigeon_Project-The_Picky_Pigeons-2021-12-17/videos/164_100ms_gopro_cut_day4_gp1-005.MP4
Duration of video [s]:  599.98 , recorded with  119.88 fps!
Overall # of frames:  71926  found with (before cropping) frame dimensions:  1280 960
Starting to extract posture
72619it [41:29, 29.17it/s]
Saving results in E:\SeminarTrackingAnimalBehavior\Picky_Pigeon_Project-The_Picky_Pigeons-2021-12-17\videos...
Saving csv poses!
Starting to analyze %  E:/SeminarTrackingAnimalBehavior/Picky_Pigeon_Project-The_Picky_Pigeons-2021-12-17/videos/165_600ms_gopro_cut_day7_gp4-004.MP4
Loading  E:/SeminarTrackingAnimalBehavior/Picky_Pigeon_Project-The_Picky_Pigeons-2021-12-17/videos/165_600ms_gopro_cut_day7_gp4-004.MP4
Duration of video [s]:  599.99 , recorded with  119.88 fps!
Overall # of frames:  71927  found with (before cropping) frame dimensions:  1280 960
Starting to extract posture
72619it [41:35, 29.10it/s]
Saving results in E:\SeminarTrackingAnimalBehavior\Picky_Pigeon_Project-The_Picky_Pigeons-2021-12-17\videos...
Saving csv poses!
Starting to analyze %  E:/SeminarTrackingAnimalBehavior/Picky_Pigeon_Project-The_Picky_Pigeons-2021-12-17/videos/166_600ms_gopro_cut_day7_gp4-001.MP4
Loading  E:/SeminarTrackingAnimalBehavior/Picky_Pigeon_Project-The_Picky_Pigeons-2021-12-17/videos/166_600ms_gopro_cut_day7_gp4-001.MP4
Duration of video [s]:  599.97 , recorded with  119.88 fps!
Overall # of frames:  71925  found with (before cropping) frame dimensions:  1280 960
Starting to extract posture
72619it [41:27, 29.19it/s]
Saving results in E:\SeminarTrackingAnimalBehavior\Picky_Pigeon_Project-The_Picky_Pigeons-2021-12-17\videos...
Saving csv poses!
Starting to analyze %  E:/SeminarTrackingAnimalBehavior/Picky_Pigeon_Project-The_Picky_Pigeons-2021-12-17/videos/167_1100ms_gopro_cut_day4_gp2-002.MP4
Loading  E:/SeminarTrackingAnimalBehavior/Picky_Pigeon_Project-The_Picky_Pigeons-2021-12-17/videos/167_1100ms_gopro_cut_day4_gp2-002.MP4
Duration of video [s]:  599.99 , recorded with  119.88 fps!
Overall # of frames:  71927  found with (before cropping) frame dimensions:  1280 960
Starting to extract posture
72619it [41:54, 28.88it/s]
Saving results in E:\SeminarTrackingAnimalBehavior\Picky_Pigeon_Project-The_Picky_Pigeons-2021-12-17\videos...
Saving csv poses!
The videos are analyzed. Now your research can truly start!
 You can create labeled videos with 'create_labeled_video'
If the tracking is not satisfactory for some videos, consider expanding the training set. You can use the function 'extract_outlier_frames' to extract a few representative outlier frames.
'DLC_resnet50_Picky_Pigeon_ProjectDec17shuffle1_1030000'
deeplabcut.filterpredictions(config_path,videolist, videotype='.mp4',filtertype= 'arima',ARdegree=5,MAdegree=2)
deeplabcut.analyzeskeleton(config_path, videolist, videotype='.mp4', shuffle=1, trainingsetindex=0, save_as_csv=False, destfolder=None)
Processing E:/SeminarTrackingAnimalBehavior/Picky_Pigeon_Project-The_Picky_Pigeons-2021-12-17/videos/159.MP4
Processing E:/SeminarTrackingAnimalBehavior/Picky_Pigeon_Project-The_Picky_Pigeons-2021-12-17/videos/161.MP4
Processing E:/SeminarTrackingAnimalBehavior/Picky_Pigeon_Project-The_Picky_Pigeons-2021-12-17/videos/162_1100ms_gopro_cut_day4_gp2-007.MP4
Processing E:/SeminarTrackingAnimalBehavior/Picky_Pigeon_Project-The_Picky_Pigeons-2021-12-17/videos/163_100ms_gopro_cut_day4_gp1-003.MP4
Processing E:/SeminarTrackingAnimalBehavior/Picky_Pigeon_Project-The_Picky_Pigeons-2021-12-17/videos/164_100ms_gopro_cut_day4_gp1-005.MP4
Processing E:/SeminarTrackingAnimalBehavior/Picky_Pigeon_Project-The_Picky_Pigeons-2021-12-17/videos/165_600ms_gopro_cut_day7_gp4-004.MP4
Processing E:/SeminarTrackingAnimalBehavior/Picky_Pigeon_Project-The_Picky_Pigeons-2021-12-17/videos/166_600ms_gopro_cut_day7_gp4-001.MP4
Processing E:/SeminarTrackingAnimalBehavior/Picky_Pigeon_Project-The_Picky_Pigeons-2021-12-17/videos/167_1100ms_gopro_cut_day4_gp2-002.MP4
Create labeled videos
deeplabcut.create_labeled_video(config_path, videolist, videotype='.mp4', filtered=True, trailpoints=10, draw_skeleton = True, keypoints_only=True)
deeplabcut.plot_trajectories(config_path, videolist)
Load Existing Model
config_path = filedialog.askopenfilename(title='Choose the config.yaml file of your DeepLabCut project:')

print(f'Using project path: {config_path}')
Load new videos to analyze and/or merge to the project:
video_files = filedialog.askopenfilenames(title='Choose new video files to analyze in DeepLabCut:')
new_videos = list(video_files)

print(f'{len(new_videos)} videos selected:')
for i in range(len(new_videos)):
    print(new_videos[i])
Analyze new videos with the previously trained model
The analysis results in this step will most probably not look as desired, but this is to be expected. Bare in mind, that we are trying to analyze new, unseen videos with a model trained on different data (i.e., either other individuals, other sessions and maybe even different light conditions or camera angles). The goal of this step is to find out where the model fails to generalize and cover this shortcomings.
deeplabcut.analyze_videos(config_path, new_videos, shuffle=1, save_as_csv=True, videotype='mp4' )
deeplabcut.filterpredictions(config_path, new_videos, shuffle=1, save_as_csv=True, videotype='mp4')
deeplabcut.create_labeled_video(config_path, new_videos, filtered=True, videotype = 'mp4', save_frames=False)
Extract outlier frames
Now this is the interesting part. Instead of including more videos to the project directly, and extracting frames as usual with kmeans, we are taking advantage of the previous model to tell us what frames exactly to label. This active learning step helps us recognize the shortcomings of our model and correct it in a targeted manner.
deeplabcut.extract_outlier_frames(config_path, new_videos, automatic=True)
Now that we have extracted new frames, we need to go back and start labeling. Instead of starting from the beginning, though, we are provided the model predictions and have to drag and drop them in place. Note: Make sure to remove labels that are not visible, the model will often guess the expected position based on learned geometric constraints.
deeplabcut.refine_labels(config_path)
You can again plot your labeled frames to check annotation accuracy.
deeplabcut.check_labels(config_path)
At this point you could get an error message like this telling you that saving the video path failed. In this case, you need to add the new video paths manually for DLC to include these in the new training set. You can either add them by hand, writing in the config.yaml file in the same format as the first video paths (see here), or you can run the following command to add the list of videos to your config file:
deeplabcut.add_new_videos(config_path, new_videos, copy_videos=False)
If the permission error persists, try starting a new anaconda terminal as administrator (right click > run as administrator) and then starting jupyter notebook with elevated privileges.
Merge Datasets
After refining all outlier frames extracted above, merge the datasets to combine old and new labels in your project.
deeplabcut.merge_datasets(config_path)
deeplabcut.create_training_dataset(config_path, net_type='resnet_50', augmenter_type='imgaug')
Note: Make sure that the new videos have been included in the config.yaml file without permission issues (see above).
Re-Train Network
When training a new model with an expanded dataset, you could either choose to start fresh with new data, or use the previous model as pre-trained network for your next model. Although not yet extensively verified, lets belief that transfer learning at least won’t harm the new model.
pose_cfg =  filedialog.askopenfilename(title='Choose DeepLabCut pose_cfg.yaml file from dlc-models:')
import webbrowser
webbrowser.open(pose_cfg)
print('Please edit init_weights to include the path to the last pre-trained model...')
# Example of own pre-trained model
init_weights: D:\FacialExpression\old-DLC-Project\dlc-models\iteration-0\DLCApr14-trainset95shuffle1\train\snapshot-1030000
deeplabcut.train_network(config_path, shuffle=1, displayiters=100, saveiters=1000)